
below is my final prototype of a star wars lego animation.
I decided to make a scene with clone troppers or a could practise killing enmies and using a light saber.
the animation part was easy as pie, i loved doing it. was a very simple set up and plot, because it was only a test i didnt want to do too much.
the editing took me forever. to make a lgihtsaber effect happen i had to research how to do it, and found a online tutorial, which i had to created a coloured matte mask layer over my film and then place it in the same position and sahpe of the lightsaber prop, frame by frame through out the animation.
i also had to look up and download various of sound effects to walking, running, light saber sounds, screaming, bangs, force effects, bricks landing and a bit of dialoge. which took me all night to find, the editing process took me 2 days, even thought i had previous experience with my two years of media. it was quite a difficult an yet rewardeding process to see my end result. i dont know if iwould do a real animation for starwars because it it require alot of editing time. but this is definatly one to keep. i cant wait to star making more lego sculptures and animations =]

Wednesday, 8 December 2010
Lego Test 2
this is my first test to see how to make a lego man run, it didnt go very well as it isvery jumpy
Lego Test 1
For my next project i want to work with lego, i look around in my room and found this old star wars lego i had so i decided i wanted to make a lego star wars animation =]
i went to the animation studio and asked for an induction to use Istopmotion programme i took 2 mins to show me how to use it and its just a case of moving the object and pressin pass bar to take a pic.
this is my first test to see how to walk a lego man. this test went good, took alot of hasstle but with pateince it can be done.
Gia Doll
For my next doll i wanted it to be plant like and have plant limbs then i can watch them grow to hopefully make a montage video.
so i decided to look up the greek titan gia. these were images i found.
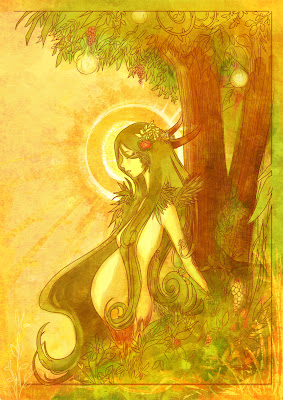


 these images depicts mother gia having leaves for hair and even made up of earthly mass for a body. so i thought her hands could be leaves for my doll. I also thought of the flower pot men which are in a flowerpot and that inspired me aswell to make this design.
 This is my design for gia, i decided to name her after the greek god/titan because it suits the plant theme alot. I decided to try and make her clothes out of leaves so they fit in with the natere look. i will need some green paint and ink to give her greenish skin and i want her veins to be dark green and visuble to make her look more plant like.
So i started of with this doll.
 This doll is perfect because of the green clothing she wears will suit the nature theme of Gia.
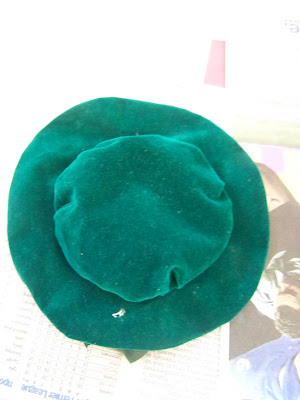 So i started with her hat and I picked leaves from outside the uni and glued them on to make the hat look like its made out of leaves.
 I think this works very well and the hat looks authentic =]
So i started to work on the doll itself to make her look more plant like and i decided to make her skin green dye painting it with green ink.
 This is the doll with one coat of green ink and her skin and a very leaf colours green tint to it so i decided ti paint on her green viens.
 This is the doll after 2 layers of green ink and added in the viens i also make her lips and highlight her eyes in green to make these features stand out.
 I then removed the dolls limbs and replaced them with spiderplants. I idea of this doll is that her new plant limbs will grow over time. I also added green into her hair. Amd i planted her into the plant pot.
 This is my Gia doll after all finishing touches have been added. Included leaves on her dress and in the pot, another layer of green ink and cuting down some of her leaves from her limbs.
I think this doll wsorks very well, its very contrasting to my scary themed dolls, so it shows i can create more then just one look. I can see this doll being used as a attractive display, i just need to make sure how often i water her because her water has no where to escape therefore i could risk drowing her.
so i decided to look up the greek titan gia. these were images i found.


So i started of with this doll.


So i started to work on the doll itself to make her look more plant like and i decided to make her skin green dye painting it with green ink.


I think this doll wsorks very well, its very contrasting to my scary themed dolls, so it shows i can create more then just one look. I can see this doll being used as a attractive display, i just need to make sure how often i water her because her water has no where to escape therefore i could risk drowing her.
Wednesday, 24 November 2010
Cross Course CRIT
lAST WEEK WE HAD OUR CROSS COURSE CRIT IN WHICH ME AND OTHER MEMBERS OF ALL THE 3 YEAR GROUPS WERE SPLIT INTO GROUPS IN WHICH TO SHOW AND TALK ABOUT OUR WORK.
At first I was rather nervous as Id thought my work isnt good enough because I have finialised ideas, and no finished projecxts and as the other memebers talked first i felt more confident and when it came to my turn most of the group liked my creativiity and imagination. Also had a comments of usful piece sof art to research and a third year was impress with the amount of work i have produced so far which had boosted my confience in my own practises. =]
At first I was rather nervous as Id thought my work isnt good enough because I have finialised ideas, and no finished projecxts and as the other memebers talked first i felt more confident and when it came to my turn most of the group liked my creativiity and imagination. Also had a comments of usful piece sof art to research and a third year was impress with the amount of work i have produced so far which had boosted my confience in my own practises. =]
Liverpool Biennial
The Liverpool Biennial trip I found it to be a rather fun day out, there were alot of interesting pieces in the exhibitions but none that i found personally stimulating or a piece that I could really connect with as a viewer, until I came across a piece titles SkyGazers 2010 by the artist NS Harsha.
Skygazers is a painted picture of various people looking up into the sky (hence the name) and most of them have thier hands together in a praying notion.
 As i walked into the room i saw these faces immediately look at you and it grabs your attention very quickly because the piece is constantly engaging with you every time you look down. Also you get a sense of power when inside the room because of the factor that they are praying making you feel like God because they are looking at you and also because you are above them, so you feel you are more important than these people looks that you. Almost like their praying for YOUR forgiveness.
This piece could be possibly made from a religious point of view, expressing his thoughts about religion, yet again this could be made for non religious people, trying to make them believe by putting them in Gods position and having his power.
 The best bit about this piece if how it flips this feeling of power in a very weird way, the ceiling is a giant mirror so when you look up, you see yourself looking down on you. which says numerous things, one is that the sky/heaven is always watching the people down below/earth, Also it could suggest how we ourselves have the power of God, by making us feel the power and then look up into yourself looking down on your self and feeling your new born power rise and sick at the same time. Which makes this piece of art emotionally engaging and is why it is one of the few pieces i liked and remember that day.
Skygazers is a painted picture of various people looking up into the sky (hence the name) and most of them have thier hands together in a praying notion.

This piece could be possibly made from a religious point of view, expressing his thoughts about religion, yet again this could be made for non religious people, trying to make them believe by putting them in Gods position and having his power.

Wednesday, 10 November 2010
Edit Photos Experiment
From the pictures I took of my girlfriend in greenfiled I decided to have a go and try to edit them to make good effects and see what results Id get.
 Is effect I got from Photoshop and adding tiles ontp the pictures and then using the torn egdes effect. I can see this picture being used with the silkscreen process to go on different things like boxes and bags and also experiement with different colours.

This effect is the sketching effect, I really like this picture, it looks like it has a rough texture like a tree so it fits in perfectly, I will definatly be using this effect again in the future.
 This picture is done in flash by Shape tweening it into another image, I randomly found out this effect last night and I think it looks really well and the image is distorted, sepreated and morphed into another image. I like how there are little particles of the image all around the picture, like an explosion.
 This image is more distorted than the first, most of the image is removed so you really have to look and pay attention to the image to see what the image originally was. Also in the bottom left corner the second image has started to come through which is was i partically like about image.
 I like this imager because of the fact is very distorted and pieced apart which gives a almost 3D effect.


This effect is the sketching effect, I really like this picture, it looks like it has a rough texture like a tree so it fits in perfectly, I will definatly be using this effect again in the future.


Saturday, 6 November 2010
Photography
Fopr my partners project she needed to get some photos in the forest of herself so I offered to take the pictures for her and we went to grenfield which is past Oldham and going toward the pennines. I used her SLR camera which I found really easy to use and found myself getting really into photography, given her ideas and suggestions for new posed and locations to take pictures in. These were the pictures I liked the most.


 I like these pictures mainly because your focus isnt souly on the girl feature din the picture you are also made to pay attention to the surroundings too. Almost making you ignore the fact theres a girl in the photo. I like the top 3 photos because they have a gentle and suttle feel about them, making you feel lonely youself.
I am very pleased with my photography skills and I will edit these pictures to see what I can get.


I am very pleased with my photography skills and I will edit these pictures to see what I can get.
String
I was given a piece of string to look after for a week and I tied it around my finger to make it into a ring so I could wear it and for which I took it to watch Saw 3D, Dispicable Me. Also it went out to a house party forhalloween and went to work with me :)
Decede Dolls: Morgona
For my next doll I started off with this female doll.

I was speculating ideas of what I could do with this doll and because I had a lack in a budget I needed an idea that would be cheap to do. And I liked the idea of making a contrasting doll. So I dstarted to do some research.
 This is probally one of the most famous characters that was a big contrast to him. With to seperate halfs of this body looking different and contasting in both mental and physical atributes. Iwill be definatly using Twoface as a inspriation to my doll.
 This is ying and yang which goes perfectly with my doll and this image is about balanced and how two things co exist and are never sperated.
This is my inital design for my doll.
 As you can see I used two face as a main starting point, making one side ugly and the other side looking beautiful. I wanted to make this doll represent death because then it will fit into my gothic themes that I use for my dolls. I researched for a good name to call her and found the name Morgana which is greek for death.
Also for her dress I wanted to contrast it on alternate sides to focus on ying and yang, making her dress messy and neat of different sides and bits.
 I cut her hair hort on half of her hair to give it a punky effect, which turned out well. And I used a market to dress a skull pattern on her face.
 I coloured in the skull pattern and did the same to her right hand, I used the old shoes from the Braun doll and gave it to this doll to contrast her even more. And I attenpted to ruff up pieces of her dress my cutting pieces off.
After completed these steps I was happy with Morgana but I felt she wasnt done yet, so I asked for som opinions and it was suggested that I paint the skull design in white to make it stand out more and look like a skull and also add colour into her hair.
 I really liked the look of my doll after colouring her face and hair with paint, her short hair looks punky and her face stands out more and makes her left eye really gaze when you look at it, which makes her look evil.
 This is Morgana completed and she definatly is a highlight to my collection, as I have learnt that I can to simple things to acheive good effects and dont have to spend any money in which to do this =]


This is my inital design for my doll.

Also for her dress I wanted to contrast it on alternate sides to focus on ying and yang, making her dress messy and neat of different sides and bits.


After completed these steps I was happy with Morgana but I felt she wasnt done yet, so I asked for som opinions and it was suggested that I paint the skull design in white to make it stand out more and look like a skull and also add colour into her hair.


Sunday, 17 October 2010
Décédé Dolls
Ive been thinking of doing customised dolls, and I've been thinking of a good name for them. Like the living dead dolls brand. After doing some vital research I thought of ladies of the night but if i was to make a male character it would suite. So it was suggested to use a translate a word into french and use that for my name. So I looked up the words death, gothic, Scary, undead, Corpse and got no names that I found interesting. So i tried using a thesaurus and used the word dead and i found the word deceased and I translated it to the french word Decede. From which I liked with put next to the word dolls, to create the name Decede Dolls.
Death = la mort
Gothic = gothique
Scary = effrayant
Undead = vampires
Corpse = cadavre
Deceased = décédé
I then started to research customised dolls to see what results I can get to inspire me and I founds these images that I liked.
 This is a 'Living Dead Doll', these dolls are sold professionally and have alot of variations and styles. I like these dolls because they are out of the ordinary and look pretty gothic. I have been into gothic art for some time and it pleases me to see a gothic range of dolls that are sold.
 This is a doll that has been customised. I like this doll because of its tacky style and also because of all the wires and masking tape make it look robotic.

 These two dolls have been created and I love the look and style of these, they have long skinny limbs which gives them a tim burton look, also the top image looks like alice from alice in wonderland.

 I decided to use a dead bug for a accessory because my girlfriend was working with a dead spider today and I thought it would look good, because theres a character from nightmare before xmas who also has a spider for a tie. I wanted to give him a cyborg face because I love cyborgs and the relation that humans have with machines. To reinforce this idea I decided to give a claw for one of his hands and make half of his face robotic and I knew I would have to cut off half of his hair. I made this clothes all riped off on different halfs to give him a contrasting look from both halfs. The contract between humans and machines, machine being perfect and neat and humans for being scruffy and making mistakes. I knew I will have to use foil to make the robotic effect on my doll. and I want to draw on his face to make him look gothic.


 This is a custom doll I found online that I think is relevant however I only have half a heads not the full face.


 I started off by adding aluminium wire and gluing it into the head, these will be its legs, I glued alot of foil pieces to fill up the head and added a small mobile camera lens for an eye.


Death = la mort
Gothic = gothique
Scary = effrayant
Undead = vampires
Corpse = cadavre
Deceased = décédé
I then started to research customised dolls to see what results I can get to inspire me and I founds these images that I liked.


This doll is more abstract and possibly more of the style that i want to do, because they look more original. Also I love the way its been painted and looks more mechanical.
After researching some images I came up with this initial design.


This is a cyber pony that I did last year on my art foundation course, I will use some of the same techniques to make my new doll. This was made by using a my little pony and a mobile phone and added wire.
This is the doll I started with.
I had to make a hole in his head so I put make him look robitic, to i got a hammer and attempted to make a gentle tap but it wouldn't even break. Unfortunately after a few taps nothing happened so I put abit more force into the tap and unfortunately it smashed the head into two pieces.


This is what I was left with, at first I was disappointed but I was determined to make this doll so it occurred to me I could turn this negative into a positive. So I decided to researched cybonic heads and other creatures from heads. and I found these.

This is a character out of toy story, made from a toys head and given a 'spider' body, it also has a missing eye like my head piece.


This is a alien form, from the film The Thing, I love this design as its scary which I want my dolls to be, I have watched this film in the past and this i one of my favorite moments. I want my doll head to look like this by cybonic. Because I'm going to do a head and a body, two set doll I shall call them Brain and Braun, because the head is all brain and the body is the braun. And I came up with these designs.

This is my design for brain, Which has adapted the designs of the head toy in toy story and the head creature from the thing. I will need foil, and wire and an old mobile phone in order to make this, I wants to cut half his hair off to give him a bizarre look.

This is brain after filling up his body and adding the eye, I like the look of him as hes beginning to take form. So i decided to add more onto him.

To make him look more cybonic, I decided to add wires onto him. It worked very well how I felt he was lacking in design to I asked around and people made suggestions to wrap wire around his legs to give them more detail.

I wrapped wire around his legs which proved to make him look more details and creepy, I also added pincers onto him to make him seem more spider like. Then I added finishing touches, by adding blood and gelling his hair.

The finished product is this, which has a very spooky and gothic look, I does look different from my internal designs, but I feel this design looks better then my drawn design. By letting chance intervene with my product making I have ended up with a better design then I could ever think of.
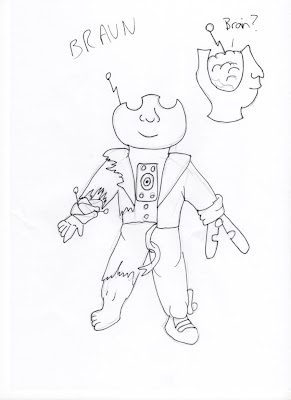
Now it was time to make Braun so I drew this initial design.

So to make this design the first step I did was to cut up his clothes and smash his hand off.

In order to make his claw I will use pegs and wrap them around the arm with masking tap, his will make him took very poor put together and the pegs will add to the 'childish' effect because he is a kids toy.

This is the claw which is pink and purple so its very colourful, and should hopefully look cute to my audience.

I then decided to go off my design and add wires into his leg, because I could imagine this dead body would need alot of electricity to make the dead corpse move and come to life, therefore his limbs would need to be wired up. I also wrapped foil around to add make his look mechanical. I also did the same to his right arm.

The next step, was to edit his head, and I thought that it would be interesting to have a brain inside. So I was thinking of materials which I could sculpt a brain and it was suggested that instead of sculpting a brain I could use some thing else to achieve the same effect. I quickly thought of monkey nuts and I put them in to see what they looked like.

I think that i made the right decision and it looks very effective, I just need to paint it. I added wire into it because his whole body is full of wires so in turn his brain would need to be aswell.

This is the brain after I painted it red and added red ink to is, I looks good because it looks bloody and juicy however its not quite the right colour. So I mixed red and white paint together and highlights the brain.

I think that highlighting the brain worked very well, bringing out the detail and making it look the right colour.

This is brain after adding red ink onto his body for blood and adding a 'tie' out of a mobile keypad to stay true to the robotic look I wanted. I really like Braun because he doesnt look very scary with out any eyes and head because I gives that illusion and you don't know what hes thinking or what hes looking at.

This is both brain and Braun together, I am very pleased with my end product. As a two piece set I feel they both complement each other and this is defiantly a doll I would like in my room at night.
Subscribe to:
Posts (Atom)